2022年10月20日 星期四

[Android] 使用ViewBinding建立BaseFragment

先在build.gradle內開啟viewBinding。

    buildFeatures{
        viewBinding true
        dataBinding true
    }

開啟後在res->layout內創建一個layout(my_fragment.xml),
Android會自動生成一個類名稱與layout名字相同的viewBinding(MyFragmentBinding),
可以使用下面的程式碼產生view。

public class MyFragment extends Fragment {
    MyFragmentBinding viewBinding;

    @Nullable
    @Override
    public View onCreateView(@NonNull LayoutInflater inflater, @Nullable ViewGroup container, @Nullable Bundle savedInstanceState) {
        viewBinding = MyFragmentBinding.inflate(inflater, container, false);
        return viewBinding.getRoot();
    }

    @Override
    public void onDestroy() {
        super.onDestroy();
        viewBinding = null;
    }
}

但當Fragment很多時,每創建一個就必須寫重復的程式碼,所以可以把重復的程式碼提取到一個父類別,每個Fragment之間的差別只有在 viewBinding的類不同,但都是繼承ViewBinding,所以可以使用泛型的方式,告訴父類別在子類別中的ViewBinding是什麼類別名稱,將父類別設成abstract,再設定abstract方法取得子類別的viewBinding物件。

public abstract class BaseFragment<V extends Viewbinding> extends Fragment {
    public V viewBinding;

    @Nullable
    @Override
    public View onCreateView(@NonNull LayoutInflater inflater, @Nullable ViewGroup container, @Nullable Bundle savedInstanceState) {
        viewBinding = getBindingInflater().invoke(inflater, container, savedInstanceState);
        return viewBinding.getRoot();
    }
    
    //取得子類的viewBinding物件
    public abstract Function3<LayoutInflater, ViewGroup, Bundle, V> getBindingInflater();

    @Override
    public void onDestroy() {
        super.onDestroy();
        viewBinding = null;
    }
}

在MyFragment中只要告訴BaseFragment子類別的viewBinding是什麼類別(MyFragmentBinding),再將viewBinding透過實作方法回傳給父類別即可。

public class MyFragment extends BaseFragment<MyFragmentBinding> {
    MyFragmentBinding viewBinding;
    
    @Override
    public Function3<LayoutInflater, ViewGroup, Bundle, MyFragmentBinding> getBindingInflater() {
        return (o1,o2,o3)->MyFragmentBinding.inflate(o1,o2,false);
    }
}

Funtion3也可與以下Get方法相同,最大的差別是Funtion3可用lambda表達式。

public abstract V getBindingInflater(LayoutInflater inflater, ViewGroup container, Bundle savedInstanceState);
public abstract Function3<LayoutInflater, ViewGroup, Bundle, V> getBindingInflater();

2022年5月15日 星期日

[Window Form] GMap的客製marker

  
    internal class CustomMarker : GMapMarker
    {
        //GMapMarker沒有Font屬性,所以自己新增
        private Font Font { get; set; } = new Font(FontFamily.GenericSansSerif, 8f, FontStyle.Bold);

        public CustomMarker(PointLatLng pos) : base(pos)
        {
            Size = new Size(20, 20);
            //Marker置中,點擊位置為中心
            Offset = new Point(-Size.Width / 2, -Size.Height / 2);
            Tag = "9";
        }

        public override void OnRender(Graphics g)
        {
            base.OnRender(g);
            var x = LocalArea.X;
            var y = LocalArea.Y;
            var w = LocalArea.Width;
            var h = LocalArea.Height;
            g.FillEllipse(Brushes.White, LocalArea);
            g.DrawEllipse(Pens.Black, LocalArea);
            //這使用Tag屬性記錄文字內容,也可使用其他屬性
            var tag = Tag?.ToString();
            //計笡文字大小
            var textSize = TextRenderer.MeasureText(tag, Font);
            g.DrawString(tag, Font, Brushes.Black, new PointF(x + (w - textSize.Width) / 2f + 1.8f, y + (h - textSize.Height) / 2f));
        }
    }

使用方法:

    Form1.cs
    //設定一組經緯座標,也可是滑鼠點擊的位置轉換而來(FromLocalToLatLng)
    //var position =  gMapControl1.FromLocalToLatLng(int x, int y);
    var position = new PointLatLng(24.064, 120.704);
    var marker = new CustomMarker(position);
    var overlay1 = new GMapOverlay("mark");
    overlay1.Markers.Add(marker);
    gMapControl1.Overlays.Add(overlay1);

2022年5月5日 星期四

[Window Form] GMap常用指令

初始化常用參數:

    //設定地圖提供者
    gMapControl1.MapProvider = GMap.NET.MapProviders.GMapProviders.OpenStreetMap;//較多可選擇
    gMapControl1.MapProvider = GMap.NET.MapProviders.GoogleChinaHybridMapProvider.Instance;
    //是否使用緩存
    GMaps.Instance.Mode = AccessMode.ServerAndCache;
    //設定缓存位置
    gMapControl1.CacheLocation = @"C:\GMapCache";
    //地圖縮放最小比例
    gMapControl1.MinZoom = 1;
    //地圖縮放最大比例
    gMapControl1.MaxZoom = 22;
    //地圖縮放當前比例
    gMapControl1.Zoom = 7;
    //是否顯示中心十字
    gMapControl1.ShowCenter = true;
    //設定地圖拖拽按鍵
    gMapControl1.DragButton = MouseButtons.Right;
    //設定地圖中心經緯度
    gMapControl1.Position = new PointLatLng(24.064, 120.704);

GMap可以任意增加圖層(Overlay),圖層上可增加任意標示(Marker)。

    //增加Marker,有內建的Marker,給予經緯度座標。
    var marker = new GMarkerGoogle(new PointLatLng(24.064, 120.704), GMarkerGoogleType.yellow_small);
    //建立裝載Marker用的Overlay,如果要區分不同Marker,可以建立不同Overlay
    var overlay = new GMapOverlay("marker");
    overlay.Markers.Add(marker);
    gMapControl1.Overlays.Add(overlay);

圖層可增加

  • GMapPolygon
  • GMapRoute
  • GMarkerGoogle

GMapRoute:

    //設定目標點位
    List<PointLatLng> points= new List<PointLatLng>
    {
        new PointLatLng(10,20),
        new PointLatLng(30,40)
    };
    //設定筆刷大小及樣式(預設是實線)
    var pen = new Pen(Color.Red, 2)
    {
        DashStyle = System.Drawing.Drawing2D.DashStyle.Dash//虛線
    };
    //建立Route
    var route = new GMapRoute(points, "route")
    {         Stroke = pen,     };     //建立Overlay     var overlay = new GMapOverlay("routes");     overlay.Routes.Add(route);     gMapControl1.Overlays.Add(overlay);

GMapPolygon:

    與GMapRoute相似,只是不會規劃路線,以及多了封閉選項。
    封閉選項 => 是否要讓最後的點位會連接到第一個點位。

座標轉換:

    //螢幕座標轉經緯度
    var latLng = gMapControl1.FromLocalToLatLng(int x, int y);
    //經緯度轉螢幕座標
    var pos = gMapControl1.FromLatLngToLocal(new PointLatLng(24.064, 120.704));

2022年5月3日 星期二

[Window Form] 載入GMap

使用NuGet下載GMap必需的相關檔案。
    工具 => NuGet套件管理員 => 管理方案的NuGet套件


在瀏覽中搜尋GMap,安裝其中的GMap.NET.Windows,它會自動去下載相依的檔案,
如:GMap.NET.Core、GMap.NET.WinForms、GMap.NET.Presentation...等。


下載完後就可以在設計模式(Design)下的工具箱中找到GMapControl。

拉出GMapControl後還需要設定一些參數才能正確顯示地圖。
還沒設定前的GMapControl:

設定前的參數:

設定 this.gMapControl1.MaxZoom = 22;
         this.gMapControl1.MinZoom = 2;
         this.gMapControl1.Zoom = 5D;
         //使用預設的大小Size(150, 150),可能小於Tile的大小,顯示會不完全
         this.gMapControl1.Size = new System.Drawing.Size(300, 300);
設定後的參數:


在建構式中設定:
    //使用何種地圖
    gMapControl1.MapProvider = GMap.NET.MapProviders.GoogleChinaHybridMapProvider.Instance;
    //是否使用緩存
    GMaps.Instance.Mode = AccessMode.ServerAndCache;
    //設定最初顯示的座標
    gMapControl1.Position = new PointLatLng(24.064, 120.704);
設定前的GMapControl:


2022年4月28日 星期四

[Window Form] 繪製地面站姿態儀(九) 使用SerialPort連接飛控

 我們使用Mission Planner提供的Example來進行Serial Port連線,

並取得飛控中的姿態資訊後與我們之前完成的UI結合在一起。


首先先下載Mission Planner的Source Code

打開Mission Planner的資料夾中的SimpleExample。

路徑 => MissionPlanner-master\ExtLibs\SimpleExample

在我們的UI中增加兩個ComboBox,一個選擇Serial Port,一個選擇BaudRate,

最後再加一個Button1當作Connect。

設定兩個ComboBox,
ComboBox1取得系統上的Serial Port

    private void comboBox1_MouseClick(object sender, MouseEventArgs e)
    {
        //取得系統上的Comport
        comboBox1.DataSource = SerialPort.GetPortNames();
    }

在建構式中設定ComboBox2,手動增加BaudRate

    var list = new List <int> { 19200,115200 };
    comboBox2.DataSource = list;

BaudRate可以參考Mission Planner的常用BaudRate,

但實際值還是要看飛控上的設定為主。


載入MAVLink:
    在SimpleExample執行後會產生一個exe檔與相關的dll,
    我們只需要將生成的MAVLink.dll引入到專案中就可以使用MAVLink了。
    參考 => (右鍵)加入參考 => 瀏覽 =>
    (下載的SourceCode => MissionPlanner-master\ExtLibs\SimpleExample\bin\Debug)
    選取 MAVLink.dll => 確定


設定Button

    private void Button1_Click(object sender, EventArgs e)
    {
        if (serialPort1.IsOpen)
            serialPort1.Close();
        serialPort1.PortName = comboBox1.Text;
        serialPort1.BaudRate = int.Parse(comboBox2.Text);
        serialPort1.Open();
        BackgroundWorker worker = new BackgroundWorker();
        worker.DoWork += Worker_DoWork;
        worker.RunWorkerAsync();
    }

    private MAVLink.MavlinkParse mavlink = new MAVLink.MavlinkParse();
    private object readLock = new object();
    private byte sysid;
    private byte compid;

    private void Worker_DoWork(object sender, DoWorkEventArgs e)
    {
        while (serialPort1.IsOpen)
        {
            try
            {
                MAVLink.MAVLinkMessage packet;
                lock (readLock)
                {
                    packet = mavlink.ReadPacket(serialPort1.BaseStream);
                    if (packet == null || packet.data == null) continue;
                }

                if (packet.data.GetType() == typeof(MAVLink.mavlink_heartbeat_t))
                {
                    var hb = (MAVLink.mavlink_heartbeat_t)packet.data;

                    // save the sysid and compid of the seen MAV
                    sysid = packet.sysid;
                    compid = packet.compid;

                    // request streams at 2 hz
                    var buffer = mavlink.GenerateMAVLinkPacket10(MAVLink.MAVLINK_MSG_ID.REQUEST_DATA_STREAM,
                        new MAVLink.mavlink_request_data_stream_t()
                    {
                        req_message_rate = 2,
                        req_stream_id = (byte)MAVLink.MAV_DATA_STREAM.ALL,
                        start_stop = 1,
                        target_component = compid,
                        target_system = sysid
                    });

                    serialPort1.Write(buffer, 0, buffer.Length);

                    buffer = mavlink.GenerateMAVLinkPacket10(MAVLink.MAVLINK_MSG_ID.HEARTBEAT, hb);

                    serialPort1.Write(buffer, 0, buffer.Length);
                }

                if (sysid != packet.sysid || compid != packet.compid)
                    continue;

                //Console.WriteLine(packet.msgtypename);

                if (packet.msgid == (byte)MAVLink.MAVLINK_MSG_ID.ATTITUDE)
                //or
                //if (packet.data.GetType() == typeof(MAVLink.mavlink_attitude_t))
                {
                    var att = (MAVLink.mavlink_attitude_t)packet.data;
                    var roll = att.roll * 57.2958;
                    var yaw = att.yaw * 57.2958;
                    var pitch = att.pitch * 57.2958;
                    userControl1.Roll = (float)roll;
                    userControl1.Yaw = (float)yaw;
                    userControl1.Pitch = (float)pitch;
                    //Console.WriteLine($@"roll => {roll}  yaw => {yaw}  pitch => {pitch}");
                }
            }
            catch (Exception)
            {
                throw;
            }
            Thread.Sleep(1);
        }
    }

2022年4月17日 星期日

[Window Form] 繪製地面站姿態儀(八) Yaw刻度加入文字

在Yaw刻度上增加文字,

每45度代表不同方位,

飛控回傳的值有可能會超過+-360度,

所以必須做出相對應的處理。

    #region Yaw
    graphics.ResetTransform();
    //增加Yaw背景
    var yawBg = new RectangleF(0, 0, Width, Height / 2f / 7.5f);
    using (var brush = new SolidBrush(Color.FromArgb(128, 255, 255, 255)))
    {
        graphics.FillRectangle(brush, yawBg);
    }
    //只顯示+-60度
    var start = Yaw - 60f;
    var end = Yaw + 60f;
    var boundaryWidth = Width / 15f;//邊界
    var space = (Width - boundaryWidth) / 120f;//間隔
    var lineHeight = yawBg.Height * 2 / 5f;//刻度
    //畫刻度(start要轉型成int,不然如果是double或float會畫不出來)
    for (var a = (int)start; a <= end; a++)
    {
        if (a % 5 == 0)
        {
            //每5度為一刻度
            var posX = yawBg.Left + boundaryWidth / 2f + (a - start) * space;
            var posY = yawBg.Bottom - lineHeight / 2f;
            using (var pen = new Pen(Color.White, 2f))
            {
                graphics.DrawLine(pen, posX, posY, posX, posY - lineHeight);
            }
            //刻度加上文字,每45度為一方位角
            if (a % 15 == 0)
            {
                var disp = a;
                while (disp < 0) disp += 360;//將角度轉換為正向角
                disp %= 360;
                string directionString;
                switch (disp)
                {
                    case 0:
                        directionString = "N";
                        break;
                    case 45:
                        directionString = "NE";
                        break;
                    case 90:
                        directionString = "E";
                        break;
                    case 135:
                        directionString = "SE";
                        break;
                    case 180:
                        directionString = "S";
                        break;
                    case 225:
                        directionString = "SW";
                        break;
                    case 270:
                        directionString = "W";
                        break;
                    case 315:
                        directionString = "NW";
                        break;
                    default:
                        directionString = disp.ToString();
                        break;
                }
                posY -= Height/2f/15f;//10
                DrawString(directionString.PadLeft(5), new Font(Font.FontFamily, fontSize), new SolidBrush(Color.White), posX, posY, graphics, StringAlignment.Center);
            }
        }
    }
    //刻度底線
    using (var pen = new Pen(Color.White, 2f))
    {
        graphics.DrawLine(pen,
            yawBg.Left + boundaryWidth / 2f,
            yawBg.Bottom - lineHeight / 2f,
            yawBg.Right - boundaryWidth / 2f,
            yawBg.Bottom - lineHeight / 2f);
    }
    #endregion

2022年4月15日 星期五

[Window Form] 繪製地面站姿態儀(七) Roll刻度加入文字

在Roll的刻度上方加入文字,

並且讓一些數字與長寬連動,之後變更長寬時仍會維持原本的比例。

    #region Roll
    int[] angles = { -60, -45, -30, -20, -10, 0, 10, 20, 30, 45, 60 };
    //要顯示的角度陣列
    var angleHeight = 25f * offset;
    //畫角度的啟始高度,最高的Pitch刻度再高一些(在這是+20度外加位移5,所以取25)
    var angleLine = offset;//4.5
    //線條的長度
    foreach (var angle in angles)
    {
        graphics.ResetTransform();
        graphics.TranslateTransform(Width / 2f, Height / 2f);
        graphics.RotateTransform(angle + Roll);
        using (var pen = new Pen(Color.White, 2f))
        {
            graphics.DrawLine(pen, 0, -angleHeight, 0, -angleHeight - angleLine);
            //旋轉畫面後再畫刻度,線條往上畫,所以減線條長度值
            DrawString(angle.ToString(),
                new Font(Font.FontFamily, fontSize),
                new SolidBrush(Color.White),
                offset / 5 * 3.75f, -angleHeight - angleLine * 2,
                graphics, StringAlignment.Center);
        }
    }
    graphics.ResetTransform();
    graphics.TranslateTransform(Width / 2f, Height / 2f);
    var arcRect = new RectangleF(-angleHeight, -angleHeight, angleHeight * 2, angleHeight * 2);
    //因為刻度都是以angleHeight為半徑,
    //所以Rectangle的XY以(angleHeight,angleHeight)為啟始點
    //長寬為angleHeight的兩倍,正方矩形。
    using (var pen = new Pen(Color.White, 2f))
    {
        graphics.DrawArc(pen, arcRect, -150f + Roll, 120f);
        //顯示角度為+-60,所以全長為120度,然後向左旋轉150度
    }

    graphics.ResetTransform();
    graphics.TranslateTransform(Width / 2f, Height / 2f);
    using (var pen = new Pen(Color.Red, 2f))
    {
        //畫三角指標
        var arrowWidth = 8f;
        var points = new PointF[3];
        points[0] = new PointF(0, -angleHeight);
        points[1] = new PointF(arrowWidth, -angleHeight + arrowWidth);
        points[2] = new PointF(-arrowWidth, -angleHeight + arrowWidth);
        graphics.DrawPolygon(pen, points);
    }
    #endregion

[Window Form] 繪製地面站姿態儀(六) Pitch刻度加入文字

上篇增加了文字的繪製,

現在要將文字新增到Pitch刻度的旁邊。

    #region Pitch
    graphics.TranslateTransform(Width / 2f, Height / 2f);
    graphics.RotateTransform(Roll);
    var longEdge = Width / 2f / 5f;//30
    var shortEdge = longEdge - 10;
    var offset = Height / 2 / 2f / 15 / 5f * 4.5f;//4.5
    var fontSize = Width / 2f / 10f / 5f * 4;//12
    for (var a = -90; a <= 90; a += 5)
    {
        //每5度為一刻度,以Pitch為中心只顯示+-20度
        if (a <= Pitch + 20 && a >= Pitch - 20)
        {
            using (var pen = new Pen(Color.White, 3f))
            {
                //每10度加強顯示
                var edge = a % 10 == 0 ? longEdge : shortEdge;
                graphics.DrawLine(pen, 
                    new PointF(-edge + 0, 0 + (Pitch - a) * offset), 
                    new PointF(edge + 0, 0 + (Pitch - a) * offset));
                DrawString(a.ToString(),
                    new Font(Font.FontFamily, fontSize),
                    new SolidBrush(Color.White),
                    -longEdge, (Pitch - a) * offset,
                    graphics, StringAlignment.Right);
            }
        }
    }

    graphics.ResetTransform();
    graphics.TranslateTransform(Width / 2f, Height / 2f);
    graphics.RotateTransform(Roll);//指標跟著Roll旋轉
    var centerRec = new RectangleF(-Width / 4f, -Height / 4f, Width / 2f, Height / 2f);
    using (var pen = new Pen(Color.Red, 4f))
    {
        //刻度指標
        graphics.DrawLine(pen, new PointF(0, 0), new PointF(-longEdge, longEdge / 2f));
        graphics.DrawLine(pen, new PointF(0, 0), new PointF(longEdge, longEdge / 2f));
        //水平指標
        graphics.DrawLine(pen, new PointF(centerRec.Left - longEdge, 0), new PointF(centerRec.Left, 0));
        graphics.DrawLine(pen, new PointF(centerRec.Right + longEdge, 0), new PointF(centerRec.Right, 0));
    }
    #endregion

[Window Form] 繪製地面站姿態儀(五) 文字繪製

文字的顯示可以使用Label處理,

但如果背景顏色與文字顏色太接近的話,

文字就會看不清楚了,

這邊提供一個文字描邊的方式,

讓文字有個明顯的邊界利於辨識。

    private static void DrawString(string text, Font font, Brush brush, float x, float y, Graphics graphics)
    {
        //計算文字大小
        var textSize = TextRenderer.MeasureText(text, font);
        //文字轉圖片
        using (var tmpBitmap = new Bitmap(textSize.Width, textSize.Height))
        {
            using (var g = Graphics.FromImage(tmpBitmap))
            {
                //文字優化(去鋸齒)
                g.SmoothingMode = SmoothingMode.AntiAlias;
                g.InterpolationMode = InterpolationMode.NearestNeighbor;
                g.CompositingMode = CompositingMode.SourceOver;
                g.CompositingQuality = CompositingQuality.HighSpeed;
                g.PixelOffsetMode = PixelOffsetMode.HighSpeed;
                g.TextRenderingHint = TextRenderingHint.AntiAlias;
                using (GraphicsPath path = new GraphicsPath())
                {
                    //取得路徑
                    path.AddString(text, font.FontFamily, (int)FontStyle.Bold, font.Size, new Point(0, 0), new StringFormat());
                    using (var pen = new Pen(new SolidBrush(Color.Black), font.Size / 10))
                    {
                        //描邊
                        g.DrawPath(pen, path);
                    }
                    //填字
                    g.FillPath(brush, path);
                    brush.Dispose();
                }
            }
            //畫圖片
            graphics.DrawImage(tmpBitmap, new PointF(x, y));
        }
    }

為了不同情況下,文字放的位置不同,多了StringAlignment可選擇。

    private enum StringAlignment
    {
        Left, 
        Right, 
        Center
    }

新增StringAlignment至DrawString

    private static void DrawString(string text, Font font, Brush brush, float x, float y, Graphics graphics, StringAlignment alignment)
    {
        //計算文字大小
        var textSize = TextRenderer.MeasureText(text, font);
        //文字轉圖片
        using (var tmpBitmap = new Bitmap(textSize.Width, textSize.Height))
        {
            using (var g = Graphics.FromImage(tmpBitmap))
            {
                //文字優化(去鋸齒)
                g.SmoothingMode = SmoothingMode.AntiAlias;
                g.InterpolationMode = InterpolationMode.NearestNeighbor;
                g.CompositingMode = CompositingMode.SourceOver;
                g.CompositingQuality = CompositingQuality.HighSpeed;
                g.PixelOffsetMode = PixelOffsetMode.HighSpeed;
                g.TextRenderingHint = TextRenderingHint.AntiAlias;
                using (GraphicsPath path = new GraphicsPath())
                {
                    //取得路徑
                    path.AddString(text, font.FontFamily, (int)FontStyle.Bold, font.Size, new Point(0, 0), new StringFormat());
                    using (var pen = new Pen(new SolidBrush(Color.Black), font.Size / 10))
                    {
                        //描邊
                        g.DrawPath(pen, path);
                    }
                    //填字
                    g.FillPath(brush, path);
                    brush.Dispose();
                }
            }
            //畫圖片
            switch (alignment)
            {
                case StringAlignment.Left:
                    graphics.DrawImage(tmpBitmap, new PointF(x, y - textSize.Height / 2f));
                    break;
                case StringAlignment.Right:
                    graphics.DrawImage(tmpBitmap, new PointF(x - textSize.Width, y - textSize.Height / 2f));
                    break;
                case StringAlignment.Center:
                    graphics.DrawImage(tmpBitmap, new PointF(x - textSize.Width / 2f, y - textSize.Height / 2f));
                    break;
            }
        }
    }

2022年4月14日 星期四

[Window Form] 繪製地面站姿態儀(四) Yaw刻度

    
    #region Yaw
    graphics.ResetTransform();
    //增加Yaw背景
    var yawBg = new RectangleF(0, 0, Width, Height / 2f / 7.5f);
    using (var brush = new SolidBrush(Color.FromArgb(128, 255, 255, 255)))
    {
        graphics.FillRectangle(brush, yawBg);
    }
    //只顯示+-60度
    var start = Yaw - 60f;
    var end = Yaw + 60f;
    var boundaryWidth = Width / 15f;//邊界(10)
    var space = (Width - boundaryWidth) / 120f;//間隔(剩餘空間分配給120度)
    var lineHeight = yawBg.Height * 2 / 5f;//刻度長度
    //畫刻度
    for (var a = start; a <= end; a++)
    {
        if (a % 5 == 0)
        {
            //每5度畫一次
            using (var pen = new Pen(Color.White, 2f))
            {
                var posX = yawBg.Left + boundaryWidth / 2f + (a - start) * space;
                var posY = yawBg.Bottom - lineHeight / 2f;
                graphics.DrawLine(pen, posX, posY, posX, posY - lineHeight);
            }
        }
    }
    //刻度底線
    using (var pen = new Pen(Color.White, 2f))
    {
        graphics.DrawLine(pen, 
            yawBg.Left + boundaryWidth / 2f, 
            yawBg.Bottom - lineHeight / 2f,
            yawBg.Right - boundaryWidth / 2f,
            yawBg.Bottom - lineHeight / 2f);
    }
    #endregion

[Window Form] 繪製地面站姿態儀(三) Roll刻度


先繪製Roll的刻度

 UserControl.cs

    #region Roll
    int[] angles = { -60, -45, -30, -20, -10, 0, 10, 20, 30, 45, 60 };
    //要顯示的角度陣列
    var angleHeight = 25f * offset;
    //畫角度的啟始高度,最高的Pitch刻度再高一些(在這是+20度外加位移5,所以取25)
    var angleLine = offset;//4.5
    //線條的長度
    foreach (var angle in angles)
    {
        graphics.ResetTransform();
        graphics.TranslateTransform(Width / 2f, Height / 2f);
        graphics.RotateTransform(angle + Roll);
        using(var pen = new Pen(Color.White, 2f))
        {
            graphics.DrawLine(pen, 0, -angleHeight, 0, -angleHeight - angleLine);
            //旋轉畫面後再畫刻度,線條往上畫,所以減線條長度值
        }
    }
    #endregion

再增加弧線修飾及三角指標

    graphics.ResetTransform();
    graphics.TranslateTransform(Width / 2f, Height / 2f);
    var arcRect = new RectangleF(-angleHeight, -angleHeight, angleHeight * 2, angleHeight * 2);
    //因為刻度都是以angleHeight為半徑,
    //所以Rectangle的XY以(-angleHeight,-angleHeight)為啟始點
    //長寬為angleHeight的兩倍,正方矩形。
    using (var pen = new Pen(Color.White, 2f))
    {
        graphics.DrawArc(pen, arcRect, -150f + Roll, 120f);
        //顯示角度為+-60,所以全長為120度,然後向左旋轉150度
    }
    graphics.ResetTransform();
    graphics.TranslateTransform(Width / 2f, Height / 2f);
    using (var pen = new Pen(Color.Red, 2f))
    {
        //畫三角指標
        var arrowWidth = 8f;
        graphics.DrawLine(pen, 0, -angleHeight, arrowWidth, -angleHeight + arrowWidth);
        graphics.DrawLine(pen, 0, -angleHeight, -arrowWidth, -angleHeight + arrowWidth);
        graphics.DrawLine(pen, arrowWidth, -angleHeight + arrowWidth, -arrowWidth, -angleHeight + arrowWidth);
    }

三角指標可使用DrawPolygon取代

    using (var pen = new Pen(Color.Red, 2f))
    {
        //畫三角指標
        var arrowWidth = 8f;
        var points = new PointF[3];
        points[0] = new PointF(0, -angleHeight);
        points[1] = new PointF(arrowWidth, -angleHeight + arrowWidth);
        points[2] = new PointF(-arrowWidth, -angleHeight + arrowWidth);
        graphics.DrawPolygon(pen, points);
    }

天空與地面也會跟著Roll旋轉,所以也相對應的修改

    #region sky
    //畫面中心旋轉
    graphics.TranslateTransform(Width / 2f, Height / 2f);
    graphics.RotateTransform(Roll);
    //天空
    var scale = Height / 2f / 90f;
    //因為旋轉後畫面不完整,所以長增加1.7倍,寬增加1.2倍
    var skyRec = new RectangleF(-Width, -Height*1.2f+Pitch*scale,Width*1.7f,Height*1.2f);//因為高多1.2倍,所以y上移1.2倍
    using (var linearBrush = new LinearGradientBrush(skyRec, Color.White, Color.Blue, LinearGradientMode.Vertical))
    {
        graphics.FillRectangle(linearBrush, skyRec);
    }
    //地面
    var groundRec = new RectangleF(-Width, 0+ Pitch * scale, Width*1.7f, Height*1.2f);
    using (var linearBrush = new LinearGradientBrush(groundRec, Color.Brown, Color.White, LinearGradientMode.Vertical))
    {
        graphics.FillRectangle(linearBrush, groundRec);
    }
    #endregion

2022年4月13日 星期三

[Window Form] 繪製地面站姿態儀(二) Pitch刻度

上一篇已經完成天空與地面的繪製,

接下來要繪製Pitch的刻度。

UserControl.cs

    #region Pitch
    graphics.TranslateTransform(Width / 2f, Height / 2f);//設定繪圖原點至畫面中心
    graphics.RotateTransform(Roll);//與Roll連動
    var longEdge = 30f;
    var shortEdge = longEdge - 10f;
    var offset = 4.5f;//增加間距(純美觀可不加)
    for (var a = -90; a <= 90; a += 5)
    {
        //每5度為一刻度,以Pitch為中心只顯示+-20度
        if (a <= Pitch + 20 && a >= Pitch - 20)
        {
            using (var pen = new Pen(Color.White, 3f))
            {
                //每10度加強顯示
                if (a % 10 == 0)
                {
                    graphics.DrawLine(pen, new PointF(-longEdge + 0, 0 + (Pitch - a) * offset), new PointF(longEdge + 0, 0 + (Pitch - a) * offset));
                }
                else
                {
                    graphics.DrawLine(pen, new PointF(-shortEdge + 0, 0 + (Pitch - a) * offset), new PointF(shortEdge + 0, 0 + (Pitch - a) * offset));
                }
            }
        }
    }
    graphics.ResetTransform();
    #endregion

可以使用三元運算子簡化

    #region Pitch
    graphics.TranslateTransform(Width / 2f, Height / 2f);
    graphics.RotateTransform(Roll);
    var longEdge = Width/2f/5f;//30
    var shortEdge = longEdge - 10f;
    var offset = Height/2f/15f/5*4.5f;//4.5
    //確認數值後跟長寬連動,這樣無論長寬如何改變比例都會維持
    for (var a = -90; a <= 90; a += 5)
    {
        if (a <= Pitch + 20 && a >= Pitch - 20)
        {
            var edge = a % 10 == 0 ? longEdge : shortEdge;
            using (var pen = new Pen(Color.White, 3f))
            {
                graphics.DrawLine(pen, new PointF(-edge + 0, 0 + (Pitch - a) * offset), new PointF(edge + 0, 0 + (Pitch - a) * offset));
            }
        }
    }
    graphics.ResetTransform();
    #endregion

為了讓角度0時有明顯的提示,另外加了綠粗線條。

    #region Pitch
    graphics.TranslateTransform(Width / 2f, Height / 2f);
    graphics.RotateTransform(Roll);
    var longEdge = Width/2f/5f;;
    var shortEdge = longEdge - 10f;     var offset = Height/2f/15f/5f*4.5f;
    for (var a = -90; a <= 90; a += 5)     {         if (a <= Pitch + 20 && a >= Pitch - 20)         {             var edge = a % 10 == 0 ? longEdge : shortEdge;             using (var pen = a == 0 ? new Pen(Color.Green, 5f) : new Pen(Color.White, 3f))             {                 graphics.DrawLine(pen, new PointF(-edge + 0, 0 + (Pitch - a) * offset), new PointF(edge + 0, 0 + (Pitch - a) * offset));             }         }     }     graphics.ResetTransform();     #endregion

加入刻度及水平指標

    graphics.ResetTransform();
    graphics.TranslateTransform(Width / 2f, Height / 2f);
    var centerRec = new RectangleF(-Width / 4f, -Height / 4f, Width / 2, Height / 2);
    using (var pen = new Pen(Color.Red, 4f))
    {
        //刻度指標
        graphics.DrawLine(pen, new PointF(0, 0), new PointF(-longEdge, longEdge / 2f));
        graphics.DrawLine(pen, new PointF(0, 0), new PointF(longEdge, longEdge / 2f));
        //水平指標
        graphics.DrawLine(pen, new PointF(centerRec.Left - longEdge, 0), new PointF(centerRec.Left, 0));
        graphics.DrawLine(pen, new PointF(centerRec.Right + longEdge, 0), new PointF(centerRec.Right, 0));
    }

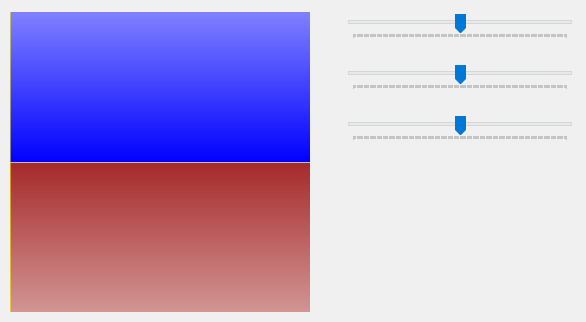
[Window Form] 繪製地面站姿態儀(一) 天空與地面

主要在Form1(主畫面)中拉三個TrackBar當作輸入源分別為TB_Roll(-60~60)、TB_Yaw(-360~360)、TB_Pitch(-90~90),最後是一個UserControl繪製姿態儀(Hud)大小為300x300。

在UserControl內先設定三個屬性分別為Roll、Yaw、Pitch

UserControl.cs

    private float _pitch;
    public float Pitch { get => _pitch; set { _pitch = value; Invalidate(); } }
    private float _roll;
    public float Roll { get => _roll; set { _roll = value; Invalidate(); } }
    private float _yaw;
    public float Yaw { get => _yaw; set { _yaw = value; Invalidate(); } }
    protected override void OnPaint(PaintEventArgs e)
    {
        base.OnPaint(e);
        var graphics = e.Graphics;//取得畫布
        var skyRec = new RectangleF(0, 0, Width, Height/2f);
        //定義天空的範圍,(0,0)為左上角當原點,天空是上半部,所以長寬為畫面高度的一半
        using (var linearBrush = new LinearGradientBrush(skyRec, Color.White, Color.Blue, LinearGradientMode.Vertical))
        {
            //使用LinearGradientBrush,由上至下,由白至藍,畫在定義的區塊內
            graphics.FillRectangle(linearBrush, skyRec);
        }
        var groundRec = new RectangleF(0, Height/2f, Width, Height/2f);
        //定義地面的範圍,(0,Height/2)為地面的啟始點,地面是下半部,所以長寬為畫面高度的一半
        using (var linearBrush = new LinearGradientBrush(groundRec, Color.Brown, Color.White, LinearGradientMode.Vertical)
        {
            //使用LinearGradientBrush,由上至下,由咖啡至白,畫在定義的區塊內       
            graphics.FillRectangle(linearBrush, groundRec);
        }
    }

加入與Pitch的連結

    //天空
    var skyRec = new RectangleF(0, 0 + Pitch, Width, Height/2f);
    using (var linearBrush = new LinearGradientBrush(skyRec, Color.White, Color.Blue, LinearGradientMode.Vertical))
    {
        graphics.FillRectangle(linearBrush, skyRec);
    }
    //地面
    var groundRec = new RectangleF(0, Height/2f + Pitch, Width, Height/2f);
    using (var linearBrush = new LinearGradientBrush(groundRec, Color.Brown, Color.White, LinearGradientMode.Vertical))
    {
        graphics.FillRectangle(linearBrush, groundRec);
    }
要記得每個TrackBar的Value要綁定UserControl相對應的屬性

Form1.cs

    userControl1.DataBindings.Add(new Binding("Roll", TB_Roll, "Value"));
    userControl1.DataBindings.Add(new Binding("Yaw", TB_Yaw, "Value"));
    userControl1.DataBindings.Add(new Binding("Pitch", TB_Pitch, "Value"));

拉動TB_Pitch的時候會發現上下會有缺塊,

是因為超出範圍了,所以要將上下的面積加大一倍。

    //天空
    var skyRec = new RectangleF(0, -Height / 2f + 0 + Pitch, Width, Height);//Height變為2倍,Y軸也要跟著往上(負值)移動(Height/2f)
    using (var linearBrush = new LinearGradientBrush(skyRec, Color.White, Color.Blue, LinearGradientMode.Vertical))
    {
        graphics.FillRectangle(linearBrush, skyRec);
    }
    //地面
    var groundRec = new RectangleF(0, Height / 2f + Pitch, Width, Height);//Height變為2倍
    using (var linearBrush = new LinearGradientBrush(groundRec, Color.Brown, Color.White, LinearGradientMode.Vertical))
    {
        graphics.FillRectangle(linearBrush, groundRec);
    }

x在UserControl的建構式中將DoubleBuffered開啟改善畫面閃爍的問題

    public UserControl()
    {
        InitializeComponent();
        DoubleBuffered = true;
    }

2022年3月28日 星期一

[WPF] DataBinding-進階篇(三)UserControl自定義屬性綁定ViewModel

 建立一個ViewModel並自定義屬性取代UserControl中的自定義屬性

ViewModel.cs:

    class ViewModel : INotifyPropertyChanged
    {
        public event PropertyChangedEventHandler PropertyChanged;

        private int _labelValue;
        public int LabelValue
        {
            get => _labelValue;
            set
            {
                _labelValue = value;
                Console.WriteLine(_labelValue);
                PropertyChanged?.Invoke(this, new PropertyChangedEventArgs("LabelValue"));
            }
        }
    }

INotifyPropertyChanged主要作用是通蜘UI介面對應的屬性值有改變了。

MainWindow中Slider的Value<=>ViewModel的LabelValue<=>UserControl中Label3的Content

在MainWindow要綁定ViewModel屬性方式跟綁定UserControl的屬性一樣,

分為使用code綁定或是在XAML內綁定。

MainWindow使用code綁定ViewModel屬性:

    public MainWindow()
    {
        InitializeComponent();
        DataContext = new ViewModel();
        Slider1.SetBinding(Slider.ValueProperty, new Binding("LabelValue"));
    }

MainWindow的XAML內綁定ViewModel屬性:

<Window x:Class="WpfApp3.MainWindow" xmlns="http://schemas.microsoft.com/winfx/2006/xaml/presentation" xmlns:x="http://schemas.microsoft.com/winfx/2006/xaml" xmlns:d="http://schemas.microsoft.com/expression/blend/2008" xmlns:mc="http://schemas.openxmlformats.org/markup-compatibility/2006" xmlns:local="clr-namespace:WpfApp3" mc:Ignorable="d" Title="MainWindow" Height="400" Width="300"> <Window.DataContext> <local:ViewModel/> </Window.DataContext> <Grid> <Grid.RowDefinitions> <RowDefinition/> <RowDefinition/> </Grid.RowDefinitions> <Slider x:Name="Slider1" Grid.Column="1" HorizontalAlignment="Center" Grid.Row="1" VerticalAlignment="Center" Width="250" ValueChanged="Slider1_ValueChanged" SmallChange="1" Maximum="100" Value="{Binding LabelValue}"/> <local:UserControl1 x:Name="UserControl_Labels" HorizontalAlignment="Center" VerticalAlignment="Center" LabelValue1="{Binding ElementName=Slider1, Path=Value}" LabelValue2="{Binding ElementName=Slider1, Path=Value}"/> </Grid> </Window>

以上這兩個方式是等效的。

設定DataContext為ViewModel,然後將Slider1的Value與ViewModel的LabelValue綁定。

UserControl用code做綁定:

    public partial class UserControl1 : UserControl
    {
        public UserControl1()
        {
            InitializeComponent();
            Label1.SetBinding(ContentProperty, new Binding(nameof(LabelValue1)) { Source = this });
            Label3.SetBinding(ContentProperty, new Binding() {Path = new PropertyPath(nameof(ViewModel.LabelValue))});
            //這邊不需設定DataContext,會自動參考到ViewModel的LabelValue
            //但如果在這或是XAML內有設定全域性的DataContext,則這裡的綁定會失效。       
        }

        public object LabelValue1
        {
            get => GetValue(LabelValue1Property);
            set => SetValue(LabelValue1Property, value);
        }

        public static readonly DependencyProperty LabelValue1Property =
            DependencyProperty.Register("LabelValue1", typeof(object), typeof(UserControl1));

        public object LabelValue2
        {
            get => (object)GetValue(LabelValue2Property);
            set => SetValue(LabelValue2Property, value);
        }

        public static readonly DependencyProperty LabelValue2Property =
            DependencyProperty.Register("LabelValue2", typeof(object), typeof(UserControl1), new PropertyMetadata(3.0));
    }

UserControl的XAML內做綁定:

<UserControl x:Class="WpfApp3.UserControl1"

             xmlns="http://schemas.microsoft.com/winfx/2006/xaml/presentation"

             xmlns:x="http://schemas.microsoft.com/winfx/2006/xaml"

             xmlns:mc="http://schemas.openxmlformats.org/markup-compatibility/2006" 

             xmlns:d="http://schemas.microsoft.com/expression/blend/2008" 

             xmlns:local="clr-namespace:WpfApp3"

             mc:Ignorable="d"

             d:DesignHeight="400" d:DesignWidth="400">


    <Grid>

        <Grid.RowDefinitions>

            <RowDefinition/>

            <RowDefinition/>

            <RowDefinition/>

        </Grid.RowDefinitions>


        <Label x:Name="Label1"

               Content="Label1" 

               HorizontalAlignment="Stretch"

               Grid.Row="0" 

               VerticalAlignment="Stretch" 

               HorizontalContentAlignment="Center"

               VerticalContentAlignment="Center"

               FontSize="36" 

               Background="#FFAA2525" 

               Foreground="#FFFBF8F6"/>

        <Label x:Name="Label2"

               d:DataContext="{d:DesignInstance Type=local:UserControl1}"

               DataContext="{Binding RelativeSource={RelativeSource Mode=FindAncestor, AncestorType=local:UserControl1}}"

               Content="{Binding LabelValue2}"

               HorizontalAlignment="Stretch"

               Grid.Row="1" 

               VerticalAlignment="Stretch"

               VerticalContentAlignment="Center" 

               HorizontalContentAlignment="Center"

               FontSize="36" 

               Background="#FF60B646"

               Foreground="#FFFBF8F6"/>

        <Label x:Name="Label3"

               d:DataContext="{d:DesignInstance Type=local:ViewModel}"

               Content="{Binding LabelValue}"

               HorizontalAlignment="Stretch"

               Grid.Row="2"

               VerticalAlignment="Stretch"

               VerticalContentAlignment="Center" 

               HorizontalContentAlignment="Center"

               FontSize="36"

               Background="#FF28389C"

               Foreground="#FFFBF8F6">

        </Label>

    </Grid>

</UserControl>

這比較不一樣的是 d:DataContext="{d:DesignInstance Type=local:UserControl1}"

以及d:DataContext="{d:DesignInstance Type=local:ViewModel}",

這兩行的效果是在設計階段引用參考實例,

在UI上顯示綁定後的值,如果是數值就顯示數字、如果是物件就顯示物件名稱。

PS.Label3不需設定DataContext。

DataContext="{Binding RelativeSource={RelativeSource Mode=FindAncestor, AncestorType=local:UserControl1}}"

屬於區域性的DataContext設定,如果設定全域性的DataContext會影響Label3綁定ViewModel的LabelValue。

PS.Label2綁定UserControl的LabelValue2,而Label3綁定的是ViewModel的LabelValue。

簡單說就是Label2是綁定自身屬性,Label3是綁定其他物件的屬性。

如果是參考單一ViewModel屬性或是自身屬性的話,只需設定全域性的DataContext。